Solving the world's problems while fitting in our pants

Solving the world's problems while fitting in our pants

Tuesday, August 2, 2016

It's Birthday Week!

In my house we have what we call "birthday week."  We do this because all 3 of my children have their birthdays in a matter of 2 days.  My twin sons turned 6, August 14th, and then their younger sister turned 4 on August 15th.   

I always grew up knowing that my birthday was special and when I had kids I wanted to do the same thing for them.  I think I also wanted to make sure that they always felt extra special on their birthday because the boys would always have to share their birthday and then with their sister being born just the day after theirs, I knew I had to step up my game. 

This year was the first time that we did a combination of themes for the family birthday party. (For the past 4 years I have been able to get away with 1 theme). 

This year it was "Rainbows and Pokemon!"  When asking the boys about what we should do for their cake they said they wanted a "Pokemon ice cream cake with Blue Bunny Birthday Cake ice cream."  Well that was specific.  So then I ask Piper what she would like and she wanted "rainbow cupcakes."  Whew, okay I can do that.  Thanks for making that easy.  

This is what we came up with for Piper's rainbow cupcakes.  Cute, easy, and delicious.  We also had confetti cupcakes as well just didn't get a picture.  The rainbows are just little sour ribbon candy that I cut in 1/3.

After we figured out Piper's cupcakes I started figuring out how to do some amazing ice cream cake Pokemon ball.  I can do this right?!?!  I mean I couldn't just call Dairy Queen to have them make it since they wanted certain ice cream in it!?!?!  So I did some research and little to my surprise, found nothing helpful on the internet about how to make a round ice cream cake (because it was only ice cream no actually cake in it).  

With a lot of thinking and planning I came up with an idea and then made a plan, with 3 backup plans.

Plan A: make an ice cream cake Pokemon ball

Plan B: make an ice cream cake Pokemon semi ball

Plan C: just use a springform pan to layer ice cream and decorate it to look kind of like a Pokemon ball

Plan D: call Dairy Queen to do it!

Lucky for me I only had to go to plan b.  

This ice cream cake was going to be triple layer with the top layer being Blue Bunny Cherry Pickin' Chocolate, the middle layer being the birthday cake ice cream, and then the bottom layer being Kemp's vanilla bean frozen yogurt, with fudge and crumbled Oreos in the middle of each layer.  

I started with a Pyrex bowl and a springform pan.  

I spread about 3 cups on the bottom of the bowl and pan. 

Used some hot water to smooth out the layers.


And then covered the pans to freeze them for a couple hours so that I could put the fudge and Oreo layer.

In the meantime I recruited help to crush the Oreos from a couple of the going to be birthday kids.


I removed the ice cream from the freezer and added Oreos to the cherry layer first since it would be flipped upside down.
And then we added the Mrs. Richardsons hot fudge sauce, about 1/2 jar.

We then added the birthday cake ice cream, and let it all freeze again overnight!


The next morning as you can see I needed to put the semi ball together.  I ended up turning the Pyrex bowl over with my hand in the bottom and running it under water to get it out of the bowl.  


Finally it came out and here's my helper in the morning licking up all extras!

Here's the 3 layer cake put together, and then I covered it with plastic wrap and froze it overnight again.

I then called in a cake decorator friend to help me with the beautifying of the Pokemon ice cream cake and it turned out Amazing!


I will disclose that I decided to take the ice cream cake home on a 100 degree day and it melted a little.  It still looked very cool but I guess it then looked a little more "homemade" 😁. 

I showed Cyril and Paxton their cake and told them what had happened and they still were in awe of the Pokemon ice cream cake and they loved it.  They said "don't worry mommy it doesn't have to be perfect.  We still like it and want to eat it."  And right there I knew that sometimes I try to do everything perfect in life and even though I might have some #momfails, I am doing pretty good with making memories for my little ones.  

I will say that even though it might not of looked the best when we ate it, it was the best birthday ice cream cake and the Flavors of the ice cream with the thick layers of fudge and cookie crumbles were delicious.  I know I would do some things differently if I did one again but I think for the first time it turned out great.

Here's also some other fun things that we did for birthday week! 

Birthday mornings consist of sugar as well!  Confetti birthday pancakes with frosting, syrup and more sprinkles! 

Nighttime adventures in Omaha trying to find candy since our hotel didn't have any!

Omaha Zoo! 

We can't take a normal picture.

And I realized what my future with look like in 10-12 years when they can all drive!! 😁 Scary!!


What do you do for birthdays?  Do you make them super special or just another day?


August is National Peach Month


I don't know if there is anything better than a fragrant and ripe peach.  I have always loved peaches all my life and I will say that the past couple years I haven't had the best luck with peaches but this year my love of peaches was renewed when our produce manager got in Missouri peaches.  I know every state has peaches and I'm not trying to start a state peach war, but I'm going to throw it out there that Missouri peaches are the best peaches out there.  Oh man, this is what life is about. These peaches are AH-MAZING!  There I said it!  I mean I should know, I have had at least one a day for the past couple weeks.  I feel like my stomach is getting ready to hibernate and trying to stock up for when the weather gets colder and all I'm left with is apples and oranges as my go to fruit.


Lucky for you I have a delicious and quick and fun recipe to include peaches.  You can use frozen peaches in the recipe and enjoy this recipe all year long if you would like and it's just as delicious.

The recipe is a peach cobbler with a twist.  The twist being that one day when I was asking my boys what else I should add to this dessert to kick it up a notch, one said I should add blueberries, and the other said I should add pineapple.  Hence how the Wertzberger Fruit Cobbler was born and boy was it delicious! 


All you need is these few ingredients!


Let's start by first cutting the pineapple: Cut the top and bottom off the pineapple and throw away.

Next slide your knife down the pineapple discarding the hard out skin and the brown eyelets that are very woody. 


Next cut the pineapple in 1/4th to remove the center hard core.


Take the pineapple and cut into small dices.


Once the pineapple and peach are cut, put all the fruit, cornstarch, sugar, and cinnamon in the pan.

Pour over the unprepared box cake mix and top with a stick of butter.


Throw it in the oven for 40-55 minutes and Viola!!!


So delicious!!  Let it cool a little bit and serve up warm.  If you want true bliss add some vanilla bean ice cream!!


Wertzberger Fruit Cobbler


½ fresh pineapple, cored, and diced                                   
3 c. peaches, frozen or pitted and sliced
2 c. blueberries, fresh                                                                         
1 box yellow cake mix
¼ c. Sugar                                                       
2 tbsp. Cornstarch
1 tsp. Cinnamon, ground
1 c. water, apple or pineapple juice
1 stick butter, sliced thinly 


Preheat oven to 350 degrees.  In a sprayed 9x13 pan add the pineapple, peaches, blueberries, sugar, cornstarch and cinnamon and stir until all incorporated.  Pour the water or juice over top the fruit and mix.  Sprinkle the cake mix on top of the fruit without stirring.  Lastly cut the butter into small pieces and lay over top the cake mix.  Place pan in the oven and cook for 40-55 minutes until cake browns and a knife comes out clean.  Remove from oven and let cool for 10 minutes before eating.

-Cool


Friday, July 29, 2016

Comfort Food with a Turkey Twist


Hey everyone!! This is Sonja and I’m guest blogging for Crazy and Cool this week! J I am currently a dietetic intern with Iowa State University (Go Cyclones!!) and am working with and learning from Crazy! I know what you’re thinking, “Wow! You are so lucky!” and to you sir/ma’am I say, “yes, yes I am a lucky lady.” What a Crazy fun experience! J

For my guest blog I decided to make Jalapeño Turkey Meatloaf, a recipe from Jennie-O! It turned out amazing if I may say so myself. To be honest, the meatloaf was my recipe of choice because my boyfriend made traditional beef meatloaf last week and I felt that it was necessary to turn it into a competition. Like most things, much more fun as a competition! Especially when you are the winner and of course I was! My Jennie-O turkey meatloaf had with less sugar, calories and fat than his traditional recipe and was still packed with all the delicious flavor of meatloaf there was no competition!

Step 1- First I preheated my oven to 350 degrees!! – Step 1, easy peasy, Winning!

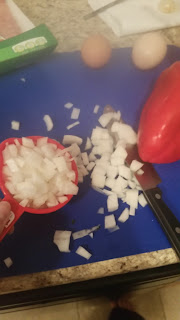
Step 2- I measured all of the ingredients! The hardest part about this step was cutting the peppers and onion!! 


Step 3- I removed ½ cup of tomato sauce from the 15oz can of tomato sauce. This part of the recipe isn’t written very clearly. Luckily I am a Cyclone and I was able to use my educated brain to figure it out! This half cup was set aside to be mixed with the Jennie-O ground turkey and the rest of the sauce I mixed with the brown sugar and mustard. I prefer Dijon mustard so that is what I used. I am sure whatever mustard you typically use would work out just great!!

Step 4- The MOST FUN PART OF ALL, well after eating it of course, I mixed the meat, peppers, onions bread crumbs, eggs, and ½ cup tomato sauce together! It was an ooey gooey mess and I loved every second of it!


Step 5- I put the meat mixture in a pan, shaped it like a loaf of bread, topped it with the tomato sauce mix and baked it! It calls for a loaf pan but who has that?? Not this girl! Turned out just fine without! It took my loaf approximately 1 hour and 25 minutes to reach 165 degrees.


I served the turkey with asparagus, our favorite vegetable, and rice!


We’ve eaten a lot of meat loaf this week, especially since the boyfriend made a 3lb meatloaf, but it was still the bomb dot com!

INGREDIENTS

1 (15-ounce) can tomato sauce
2 teaspoons mustard
1 tablespoon brown sugar
1 and 1/2 pounds JENNIE-O® Lean Ground Turkey
1 tablesppon diced jalapeno peppers
1/2 cup diced  onion
1/4 cup diced red bell peppers
1/2 cup breadcrumbs
1/2 cup egg susbstitue or 2 eggs
1/2 teaspoon black pepper
1/2 cup tomato sauce, divided

DIRECTIONS

1. Heat oven to 350 degrees Fahrenheit
2. In a small bowl, stir together tomato sauce, mustard and brown sugar. Set aside.
3. In large bowl, mix ground turkey, jalepeno peppers, onions, red bell pepper, breadcrumbs, eggs, pepper and 1/2 cup tomato sauce. Blend well.
4. Form mixture into a rounded rectangular loaf and place in 2-inch deep pan. Spread sauce mixture evenly over meatloaf.
5. Bake 1 hour or until the internal temperature of meatloaf is well-done, 165 degrees Fahrenheit as measured by a meat thermometer. Let stand 5 minutes before slicing. Slice loaf into 10 portions.

RECIPE NUTRITION INFORMATION

Calories: 150
Protein: 15g
Fat: 5 g
Carbohydrates: 8g

For full nutrition information visit the recipe from Jennie-O at the link below.

https://www.jennieo.com/recipes/989-jalape%25C3%25B1o-turkey-meatloaf

Thursday, July 14, 2016

It's Posh to "Pop" for Your Next Party!

Summertime is the most adventurous season of the year. We pack our evenings and weekends with as many activities as possible to take advantage of the longer days and beautiful weather. In the midst of all the madness, our friends and family schedule events and gatherings to reconnect and spend quality time together. What will be the common denominator at all these exciting functions?  Food, of course!  Burgers, brats, hot dogs, potato chips, crackers, dips, pasta salads, brownies, cookies, cupcakes and countless other tempting, delicious and calorically dense eats. 

It the midst of all of ours summertime favorites, we forget about one of the most healthy and versatile snacks in the grocery store, popcorn. I have rediscovered my love for popcorn and have decided to make this my go-to summer snack for get togethers at my home and 
away from home. Almost everyone I know really loves popcorn too and I have come up with a few fun ways for you to add a little "pop" to your next party. 

This adventure all started with a little trip to my kitchen and I was only going to make my popping good creations from what I already had in my house. This is the best thing about popcorn, you can make creations of any combination your taste buds love:  from sweet to spicy, savory to sour. Popcorn compliments a wide variety of flavors and can be a lot of fun to eat. 


I always have microwave popcorn in my pantry and one of my favorites is Iowa-grown Jolly Time Pop Corn. Jolly Time has a registered dietitian approved line of healthy options:  Healthy Pop Butter and Kettle Corn, in large bags and mini bags, Healthy Pop Low Sodium, Crispy White and Caramel Apple.  All of these tasty flavors are only 20 calories per cup popped and are a good source of energy boosting whole grains and fiber. Since they are so low in calories, it leaves a little wiggle room to add a few indulgent ingredients of your own. Shall we start with one of my favorite creations out of my kitchen?


I am a HUGE fan of chocolate and I pretty much always have dark chocolate chips on hand to curb my "occasional" sweet cravings. I knew this would pair perfectly with the sweet and rich flavor of coconut. 


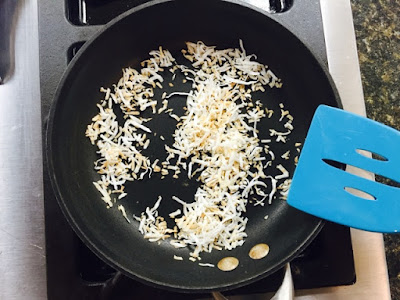
I like the pairing of dark chocolate with toasted coconut. So I measured out 1/2 cup of coconut and placed it in a pain heated to medium. Watch the coconut closely while constantly stirring to prevent it from burning. Once it is lightly brown, remove from heat. 


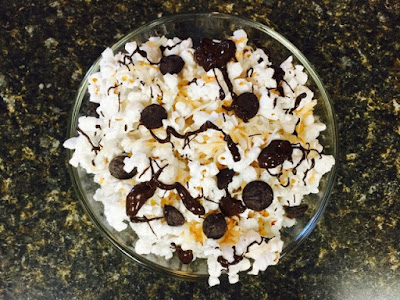
I recommend dividing your freshly popped popcorn into 4 bowls and equally divide the toasted coconut flakes, sprinkling on top. Divide 1/4 cup of dark chocolate chips between the 4 bowls. Melt 1/4 cup of the dark chocolate chips, melt and drizzle the chocolate over the 4 bowls. 
Yummmmmm!


The next surprise from the kitchen is a simple one, but involves my most favorite dried fruit:  golden raisins. All you need is 1/4 cup shelled pistachios, roughly chopped and 1/4 cup of golden raisins. Divide your freshly popped corn into 4 bowls and equally distribute the pistachios and golden raisins. Enjoy!


Drum roll please.........For the grand finally of my pantry popcorn party, this is hands down my favorite. Summer would not be summer without basil and tomatoes in mouth-watering caprese fashion.


Popcorn does not need to be limited to shelf stable add-ins, fresh and full of flavor toppings can really compliment the crunch of popcorn. All you need is 1/2 cup freshly shredded Parmesan, 1/2 cup of ribboned fresh basil leaves, 1/3 cup roughly chopped sun-dried tomatoes and 1 teaspoon of freshly cracked black pepper. 


For this creation, I like to place the 1/2 the freshly popped popcorn on a large plate for sharing. The first layer I top with half of all the toppings. Then I top that with the rest of the popcorn and repeat. I recommend making sure the popcorn is nice and warm so the cheese melts, and the heat warms the basil and tomatoes to intensify the flavor. 

Your welcome!

At your next get-together, consider forgoing the potato chips, brownies and cupcakes.  Take a "shopping" trip around your kitchen and see what flavorful, healthy, satisfying and 
posh treats you can create for your guests with my longtime favorite summertime snack:  popcorn. 

~Crazy