Solving the world's problems while fitting in our pants

Solving the world's problems while fitting in our pants

Friday, July 29, 2016

Comfort Food with a Turkey Twist


Hey everyone!! This is Sonja and I’m guest blogging for Crazy and Cool this week! J I am currently a dietetic intern with Iowa State University (Go Cyclones!!) and am working with and learning from Crazy! I know what you’re thinking, “Wow! You are so lucky!” and to you sir/ma’am I say, “yes, yes I am a lucky lady.” What a Crazy fun experience! J

For my guest blog I decided to make Jalapeño Turkey Meatloaf, a recipe from Jennie-O! It turned out amazing if I may say so myself. To be honest, the meatloaf was my recipe of choice because my boyfriend made traditional beef meatloaf last week and I felt that it was necessary to turn it into a competition. Like most things, much more fun as a competition! Especially when you are the winner and of course I was! My Jennie-O turkey meatloaf had with less sugar, calories and fat than his traditional recipe and was still packed with all the delicious flavor of meatloaf there was no competition!

Step 1- First I preheated my oven to 350 degrees!! – Step 1, easy peasy, Winning!

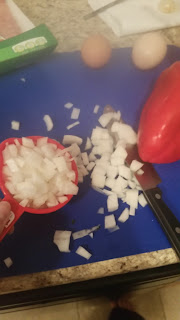
Step 2- I measured all of the ingredients! The hardest part about this step was cutting the peppers and onion!! 


Step 3- I removed ½ cup of tomato sauce from the 15oz can of tomato sauce. This part of the recipe isn’t written very clearly. Luckily I am a Cyclone and I was able to use my educated brain to figure it out! This half cup was set aside to be mixed with the Jennie-O ground turkey and the rest of the sauce I mixed with the brown sugar and mustard. I prefer Dijon mustard so that is what I used. I am sure whatever mustard you typically use would work out just great!!

Step 4- The MOST FUN PART OF ALL, well after eating it of course, I mixed the meat, peppers, onions bread crumbs, eggs, and ½ cup tomato sauce together! It was an ooey gooey mess and I loved every second of it!


Step 5- I put the meat mixture in a pan, shaped it like a loaf of bread, topped it with the tomato sauce mix and baked it! It calls for a loaf pan but who has that?? Not this girl! Turned out just fine without! It took my loaf approximately 1 hour and 25 minutes to reach 165 degrees.


I served the turkey with asparagus, our favorite vegetable, and rice!


We’ve eaten a lot of meat loaf this week, especially since the boyfriend made a 3lb meatloaf, but it was still the bomb dot com!

INGREDIENTS

1 (15-ounce) can tomato sauce
2 teaspoons mustard
1 tablespoon brown sugar
1 and 1/2 pounds JENNIE-O® Lean Ground Turkey
1 tablesppon diced jalapeno peppers
1/2 cup diced  onion
1/4 cup diced red bell peppers
1/2 cup breadcrumbs
1/2 cup egg susbstitue or 2 eggs
1/2 teaspoon black pepper
1/2 cup tomato sauce, divided

DIRECTIONS

1. Heat oven to 350 degrees Fahrenheit
2. In a small bowl, stir together tomato sauce, mustard and brown sugar. Set aside.
3. In large bowl, mix ground turkey, jalepeno peppers, onions, red bell pepper, breadcrumbs, eggs, pepper and 1/2 cup tomato sauce. Blend well.
4. Form mixture into a rounded rectangular loaf and place in 2-inch deep pan. Spread sauce mixture evenly over meatloaf.
5. Bake 1 hour or until the internal temperature of meatloaf is well-done, 165 degrees Fahrenheit as measured by a meat thermometer. Let stand 5 minutes before slicing. Slice loaf into 10 portions.

RECIPE NUTRITION INFORMATION

Calories: 150
Protein: 15g
Fat: 5 g
Carbohydrates: 8g

For full nutrition information visit the recipe from Jennie-O at the link below.

https://www.jennieo.com/recipes/989-jalape%25C3%25B1o-turkey-meatloaf

Thursday, July 14, 2016

It's Posh to "Pop" for Your Next Party!

Summertime is the most adventurous season of the year. We pack our evenings and weekends with as many activities as possible to take advantage of the longer days and beautiful weather. In the midst of all the madness, our friends and family schedule events and gatherings to reconnect and spend quality time together. What will be the common denominator at all these exciting functions?  Food, of course!  Burgers, brats, hot dogs, potato chips, crackers, dips, pasta salads, brownies, cookies, cupcakes and countless other tempting, delicious and calorically dense eats. 

It the midst of all of ours summertime favorites, we forget about one of the most healthy and versatile snacks in the grocery store, popcorn. I have rediscovered my love for popcorn and have decided to make this my go-to summer snack for get togethers at my home and 
away from home. Almost everyone I know really loves popcorn too and I have come up with a few fun ways for you to add a little "pop" to your next party. 

This adventure all started with a little trip to my kitchen and I was only going to make my popping good creations from what I already had in my house. This is the best thing about popcorn, you can make creations of any combination your taste buds love:  from sweet to spicy, savory to sour. Popcorn compliments a wide variety of flavors and can be a lot of fun to eat. 


I always have microwave popcorn in my pantry and one of my favorites is Iowa-grown Jolly Time Pop Corn. Jolly Time has a registered dietitian approved line of healthy options:  Healthy Pop Butter and Kettle Corn, in large bags and mini bags, Healthy Pop Low Sodium, Crispy White and Caramel Apple.  All of these tasty flavors are only 20 calories per cup popped and are a good source of energy boosting whole grains and fiber. Since they are so low in calories, it leaves a little wiggle room to add a few indulgent ingredients of your own. Shall we start with one of my favorite creations out of my kitchen?


I am a HUGE fan of chocolate and I pretty much always have dark chocolate chips on hand to curb my "occasional" sweet cravings. I knew this would pair perfectly with the sweet and rich flavor of coconut. 


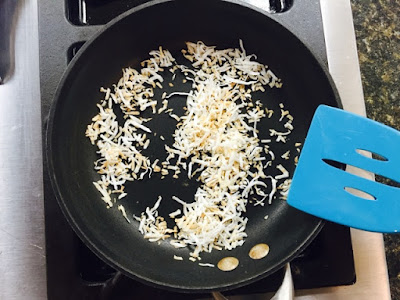
I like the pairing of dark chocolate with toasted coconut. So I measured out 1/2 cup of coconut and placed it in a pain heated to medium. Watch the coconut closely while constantly stirring to prevent it from burning. Once it is lightly brown, remove from heat. 


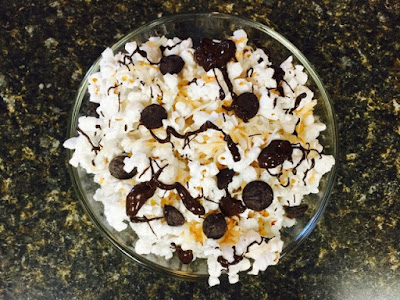
I recommend dividing your freshly popped popcorn into 4 bowls and equally divide the toasted coconut flakes, sprinkling on top. Divide 1/4 cup of dark chocolate chips between the 4 bowls. Melt 1/4 cup of the dark chocolate chips, melt and drizzle the chocolate over the 4 bowls. 
Yummmmmm!


The next surprise from the kitchen is a simple one, but involves my most favorite dried fruit:  golden raisins. All you need is 1/4 cup shelled pistachios, roughly chopped and 1/4 cup of golden raisins. Divide your freshly popped corn into 4 bowls and equally distribute the pistachios and golden raisins. Enjoy!


Drum roll please.........For the grand finally of my pantry popcorn party, this is hands down my favorite. Summer would not be summer without basil and tomatoes in mouth-watering caprese fashion.


Popcorn does not need to be limited to shelf stable add-ins, fresh and full of flavor toppings can really compliment the crunch of popcorn. All you need is 1/2 cup freshly shredded Parmesan, 1/2 cup of ribboned fresh basil leaves, 1/3 cup roughly chopped sun-dried tomatoes and 1 teaspoon of freshly cracked black pepper. 


For this creation, I like to place the 1/2 the freshly popped popcorn on a large plate for sharing. The first layer I top with half of all the toppings. Then I top that with the rest of the popcorn and repeat. I recommend making sure the popcorn is nice and warm so the cheese melts, and the heat warms the basil and tomatoes to intensify the flavor. 

Your welcome!

At your next get-together, consider forgoing the potato chips, brownies and cupcakes.  Take a "shopping" trip around your kitchen and see what flavorful, healthy, satisfying and 
posh treats you can create for your guests with my longtime favorite summertime snack:  popcorn. 

~Crazy

Friday, July 8, 2016

Kodiak Cakes Review


For our product review this month we choose Kodiak Cakes.  They have so many different flavors out there so they really do have something for everyone.  


My family and I tried out 3 different flavors  including: whole wheat, oat, and honey, dark chocolate, and superfood.  We just tried them all as pancakes and haven't tried them for waffles yet, but maybe we will do that this weekend. 


The whole wheat, oat, and honey one tasted just like any other boxed pancake mix.  I didn't get a lot of honey flavor or anything too different or spectacular with this one.  The dark chocolate was my favorite because it had little chunks of dark chocolate in it.  It was just sweet enough but not overly sweet, even after I doused it in maple syrup.  The superfood pancakes were also good, I liked this one because it actually had some texture to it and a little more flavor than the honey and oat one.  I also felt better about my kids eating three of these for breakfast than just a regular pancake without all of the adding benefits.  My kids tried all of them and 2 out of the 3 liked all of them.  One of my boys didn't care for the dark chocolate one, but when I asked why he didn't like it, he said that he wasn't hungry.   

I will say that the directions on the box said to make with a 1 c. mix to 1 c. water ratio and I thought it was too watery.  I ended up adding more pancake mix to the batter to thicken it up a little.  I would start off with directions on the box and maybe add more mix if you like your pancakes a little fluffier.


All in all I liked the pancakes and will be buying the dark chocolate ones again.  I am also going to try the other recipes on the box for the other breakfast treats.


-Cool


I get pretty excited when a package of new products, well new to me, land in my office and Kodiak Cakes surely increased my giddiness. I was ready to whip up pancakes for family, friends and clients to see if these boxes delivered plenty of yum and good nutrition.


I split up the flavors with Cool (it was hard to give up the chocolate one) and I took the Buttermilk Power Cakes and the Crunchy Peanut Butter Power Cakes. 

What really caught my eye about these mixes were not the flavors but the nutrition. These boxes of mix are packed with 100% whole grain wheat flour, 14 grams of whey protein per serving (3 cakes about the size in the picture above), 5 grams of fiber and a wholesome ingredient list packed with things we all know and can pronounce.  Woo hoo! 

I made the Buttermilk for brunch with friend and topped them with fresh strawberries from the garden. They were gobbled up before I could even get a picture! They were light and fluffy and filling because of the protein and fiber. 

I made the Crunchy Peanut Butter for a class I teach about pre-diabetes. These are a healthy choice for people watching their blood sugars and weight. They loved them and so did I. The best part about this flavor is similar to the dark chocolate one, there are little chunks of peanuts in the mix which adds a nice texture to the finished product. 

With the leftovers, I spread a couple tablespoons of peanut butter in between two of the pancakes and put them in the freezer for a protein-packed grab and go sandwich for when I am in a hurry. 

Their website has a ton of recipes to create even more delicousness like cookies and muffins. For more information go here

The Crunchy Peanut Butter will definitely be a staple in my pantry. I also will be sneaking over to Cool's house to try the dark chocolate one too! 

~Crazy


Thursday, June 30, 2016

Grilled Caeser Salad and 4th of July


This weekend is a nice long weekend and a time to celebrate America!  I love the 4th of July because it reminds of my youth and the long days of summer in Okoboji.  I lived in Spencer so Okoboji was only a quick 15 minute drive to get to all the action and summer fun.  When I was younger it was all about going to the beach or going to a friends house and jumping off their dock into the lake and swimming for hours.  As I got older Okoboji and the 4th of July was more about getting a group of friends together and going boating for hours, having a grill out and eating a lot, "cruisin' the loop" to see all the people that were out, and fireworks on the lake.

Even though I cannot be in Okoboji this weekend for the festivities I will still get together with family and friends and watch fireworks and have lots of food and a couple grill outs.  With so much fun and excitement already going on this weekend, why not make meal planning a little easier?  I have a salad that will not only be easy but it's a small little spin on a classic salad that will make a huge taste difference.


Grilled Caesar Salad is what you should be making this weekend.  Use it as a side dish, or add some chicken or salmon to it for a hearty main entrée.  Whatever you do, just try it, you won't regret it!


So there's not a lot of ingredients that you need to go out and buy which is a plus.  You will need a head of romaine lettuce, and not that stuff you find in a bag, you will also need some parmesan cheese, Caesar dressing, red onion, and black olives.


So now first step is that you will want to go and preheat your grill.  Get that puppy hot because as soon as you have cut your ingredients it will only take a couple minutes and then you will be ready to eat.


Now we are just going to take off any leaves that are wilted or don't look the best.  Then we are going to wash it and cut it down the middle lengthwise. 


That's all the cutting for the lettuce right now, so just open up the romaine lettuce and set it on a plate, or tray to take out to the grill.


I then spray the cut end of the lettuce with olive oil spray and season with freshly ground pepper and Kosher salt. 


Last thing we are going to cut is the red onion.  Just cut the ends off, and take the skin off the onion.


Cut in thin slices, which you should get between 6-10 depending on how big your onion is.


Now we are ready to pack up all our ingredients and take it out to the grill.  Yes, you can take it all out to the grill because we will prepare the salad outside.


So the first thing after the grill is preheated we are going to throw on the red onions since they take longer than the romaine lettuce.


**You can grill your onions until very soft, I usually only throw them on for about 3-4 minutes because I like the crunchy texture but I love the smoky grill flavor.**


As soon as you turn the onions over is when you will want to put the romaine lettuce on the grill, cut side down.  Shut the lid to the grill, but whatever you do don't leave!!  This step only take 2- 2 1/2 minutes. Let your lettuce cook for only a couple minutes.  You want to get some nice grill marks on your lettuce with a little smoky flavor but you don't want it cooked all the way through.  The lettuce should just start to wilt but still have a delicious crunch.


Look at the lovely little lettuce


Now that you take the lettuce and onions off the grill, go ahead and cut up the lettuce.  First start by cutting through the leaves lengthwise about 4 or 5 times.


Next turn the lettuce 90 degrees and cut the head of lettuce in about 1 in. square pieces. How easy was that?  You don't need to buy bagged lettuce again!  When the lettuce is cut just throw it in a bowl to serve.


From here you have 2 options.  #1 option would be if you are serving the salad right away, than go ahead and put the dressing right on the salad and mix until all incorporated.


Add on your cooked red onions, shredded parmesan cheese, black olives, and croutons.  Serve and Enjoy!!


If you are taking this salad to a friends or won't be serving this salad right away, I suggest putting the salad in the bottom of your dish, topped with grilled red onions, parmesan cheese, and black olives.  Wait to put the dressing and croutons on until right before serving so that the salad is fresh and crisp.


Hope you enjoy the salad, I know my family loves it.  Have a wonderful weekend!


Grilled Caesar Salad

1 head Romaine lettuce, cut in half

1 medium red onion, sliced in rings

Olive oil spray

Kosher salt and pepper

½-3/4 c. Caesar dressing

½ c. black olives

¼ c. parmesan cheese

½ c. croutons


Preheat grill to medium heat.  Spray romaine lettuce and red onions with olive oil spray and season with salt and pepper.  Grill the red onion for about 2 minutes on each side and lettuce for only 2 minutes with the cut side facing the grill.  Grill lettuce until grill marks appear and the it becomes wilted.  Remove red onion and lettuce.  Place lettuce onto the cutting board and cut into small bite size pieces.  In a medium bowl toss the grilled romaine lettuce with the Caesar dressing, top with red onion, black olives, parmesan cheese and croutons.


-Cool